
One Jump Drills
08 Mar 2006
I’ve been asked by fellow agility enthusiasts for handling drills that don’t need a whole backyard of agility equipment. So I put together the following 24 exercises requiring only a single jump. They are in rough order of increasing difficulty; but every team has different challenges. I think I’ve covered the majority of possible drills but let me know if you think of any others. The handling for each maneuver is only briefly described, I’ll add links to definition and “Learning” articles for these maneuvers as I write them in the future.
There are four things you will want to vary in all of these drills:
- Work with the dog on your left and on your right.
- Vary the approach angle as widely as possible.
- Vary the handler and dog distance from the jump.
- Vary the distance from the handler and the dog.
If you are just starting in agility I’d use a wingless jump initially, you can use a winged jump and then other types of jumps (double, triple, broad) as you and your dog become more proficient. Lastly, don’t over do it, you are better off picking a couple of these drills each day and working them for only a few minutes than trying to work through many of them in a single session. You always want to stop on a success and with the dog eager to play some more.
In the diagrams below one or more starting locations are shown to give you an idea of the range of starting locations and how they can affect your handling. However, don’t let these locations limit your practice. Practice each drills from as many different dog and handler locations as possible.
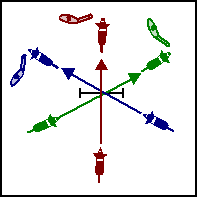
Around the Clock
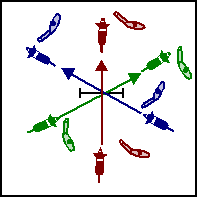
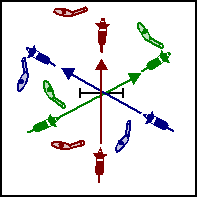
I have to give credit to Dana Pike for the name of this drill. The idea is to run with your dog over the jump at all possible approach angles (i.e. at each hour around the clock face) and reward the dog on the landing side of the jump.
Update: My article on the Around The Clock training method.
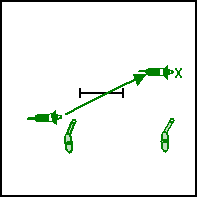
Go Jump
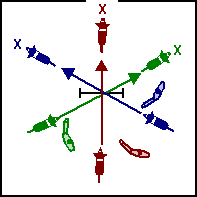
The Go Jump drill is performed with all the same approach angles and from both sides of your dog just like the Around the Clock drill. The difference being you send you dog over the jump and forward after they take the jump. After taking the jump you can throw a toy or Food Tube ahead of your dog to keep their focus moving forward. Or you can send your dog out to a target you place on the other side of the jump (shown by the “X” in the diagram).
Initially I recommend moving forward with your dog toward the jump but lag behind; you want your dog to get used to moving ahead of you over the obstacle. Eventually you should be able to send your dog over the jump from a stationary position. I believe it was Bud Houston who I first heard state that you should be able to send your dog over a jump the length of your backyard away from you from a standing start. It just takes practice.
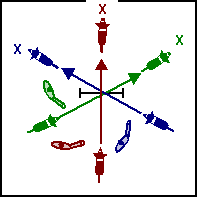
Out Jump
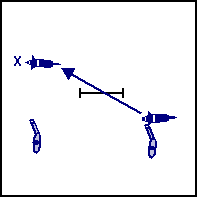
This drill is almost the same as the Go Jump drill except you are no longer facing the jump. You are sending your dog horizontally away from you to take the jump. Use the arm closest to the dog to signal (Push) it over the jump. In the diagrams above I’m only showing one orientation but try this drill varying distance, side, and approach angle. The “X” shows the location of a target or a thrown toy.
Come Jump

This drill is the opposite of the Go Jump drill. You place your dog on the opposite side of the jump and call your dog over the jump to you. You can work this drill as though you are doing a Lead Out with your dog left in a sit, down, or stand stay and you can just leave your dog standing in an informal wait and then call your dog. Again vary the dog’s approach angles and to which of your sides you want the dog to come.
Over-Come
The Over-Come drill involves sending the dog away from you to the jump and having the dog wrap around the jump and come back to you. Again you want to vary the dog’s approach angles, the side of your body and the distance from the jump.
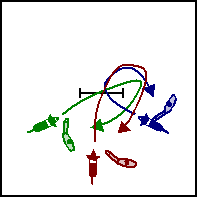
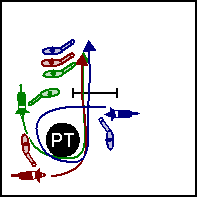
Around
The Around drill involves you pushing your dog to the opposite side of the jump and jumping toward you. If you are just starting out on this drill start close to the jump, facing the standard and with your dog almost on the backside of the jump. You want to start with an easy push to send your dog around the jump. Then start moving away from the jump toward the green path shown in the above left diagram.
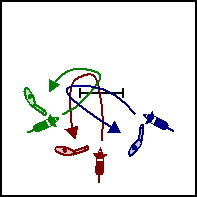
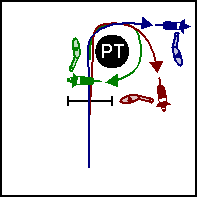
Post Turn On Take Off Side
The Post Turn Learning the Post TurnPost Turn/Shoulder Pull/Pivot Turn drill on the take off is a basic handling maneuver and can be a test of handler versus obstacle focus. You might not need to perform the extreme rotations shown in the diagrams right in front of a jump in an actual course but a 90 or 180 degree Post Turn is very common. So in addition to all the other permutations of distance, side, and angle you should change the amount of the rotation you take the dog through before taking the jump, you should also vary the location of the Post Turn before.
Post Turn On Landing Side

For this drill the handler should try two different handlings. First starting with their dog and accompany the dog over the jump. The second handling is to Lead Out to the opposite side of the jump and call the dog over the jump.
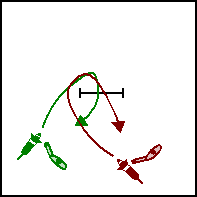
Post Turn Jump Wrap
The key to using a Post Turn to wrap your dog around the jump is to initiate the Post Turn by stepping back so your body moves in front of the jump, leaving a path for the dog to come along the side of the jump. Turning so that your body stays at the far jump standard causes a wider turn than stepping back when performing the Post Turn.
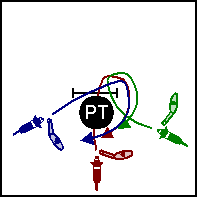
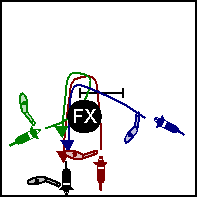
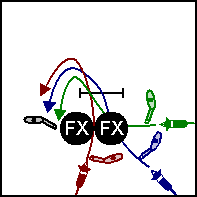
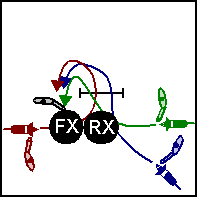
Front Cross On Take Off Side
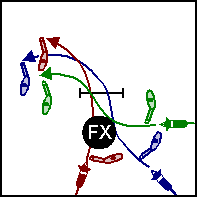

The FX shows the approximate location of the Front Cross but obviously it would need to be moved based on the handler’s path approaching the jump (you can’t run through or over the jump). Depending on your dog you are also likely to need a Lead Out to be able to get to the Front Cross location before your dog.
You also need to give yourself and your dog enough room to complete the cross without surprising your dog with the jump.
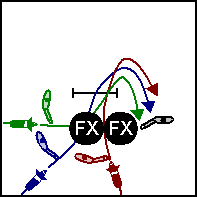
Front Cross On Landing Side
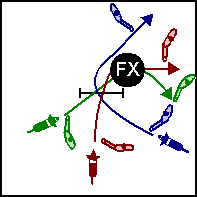
For this drill imagine you are going to a second jump somewhere on the landing side of the jump and you need to change your dog’s lead before that second jump.
The FX shows the approximate location of the Front Cross but obviously it would need to be moved based on the handler’s path approaching the jump (you can’t run through or over the jump). Depending on your dog you are also likely to need a Lead Out to be able to get to the Front Cross location before your dog.
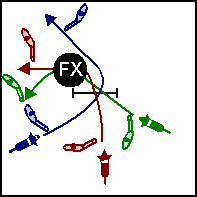
Front Cross Jump Wrap
In the diagrams above the end position for all starting locations is the same and shown by the black dog and black handler. Unlike the Post Turn Jump Wrap the Front Cross causes the handler to be on the opposite side of the dog after the wrap.
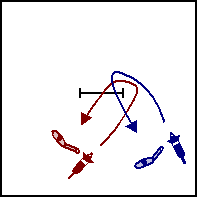
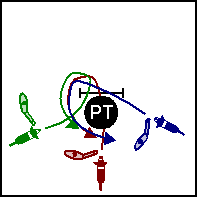
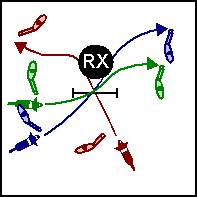
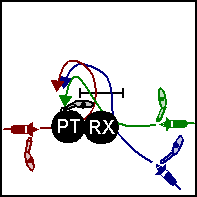
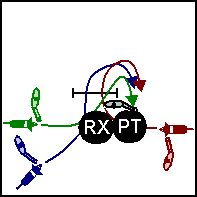
Rear Cross On Take Off Side
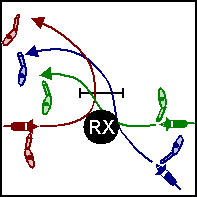
The RX shows the approximate location of the Rear Cross Learning the Rear CrossRear Cross but obviously it would need to be moved based on the handler’s path approaching the jump. Unlike the Front Cross on Take Off Side for the Rear Cross you need to draw your dog ahead of you. For both the Front and Rear cross on take off drills the intent is to initiate the Lead change before the jump.
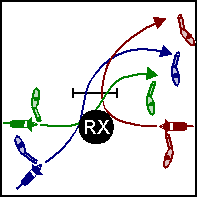
Rear Cross On Landing Side
Just like for the Front Cross On Landing Side, imagine you are going to a second jump somewhere on the landing side of the jump and you need to change your dog’s lead before that jump. Make sure you set your dog up so your path takes you straight past the jump, if you have to move sideways suddenly you’ll change your dog’s path too (and/or drop the jump bar).
However, unlike the Front Cross drill you will need to let your dog get ahead of you in order to Rear Cross. This drill is especially helpful for dogs that don’t send away from the handler. When the dog is landing from the jump it can’t help but move forward at least enough to land; it might even take an additional stride. During the landing and that stride the handler can step in behind the dog to complete the cross (the body language and/or arm signal initiating the cross occurs before the jump). The blue and green paths show how that can be done.
The brown path shows a Rear Cross on the landing side where the cross occurs after the jump where the handler doesn’t have the opportunity to step behind the dog while it is still in the landing part of the jump. So as you adjust your approach angle toward the brown path this becomes a different kind of challenge. Some trainers/handlers call this type of Rear Cross a Cross On The Flat.
Blind Cross On Take Off Side
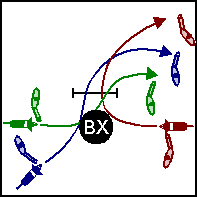
The Blind Cross on the take off side requires the handler to be ahead of the dog just like when performing a Front Cross On the Take Off Side. Remember to give a clear signal to your dog for the side on which you expect them after the cross. You may need to give yourself more room than I show in the diagrams.
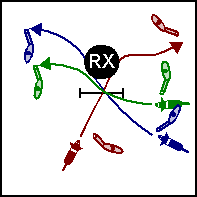
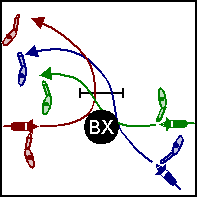
Blind Cross On Landing Side
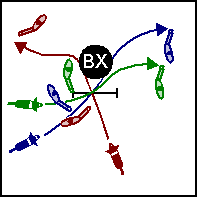
The Blind Cross on the Landing Side of the jump requires the handler to get substantially ahead of their dog. For all but the fastest handlers and slowest dogs a Lead Out will be required to get in position for the cross. As for the other diagrams the BX location would move as you change the dog’s approach to the jump.
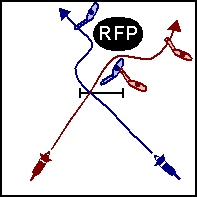
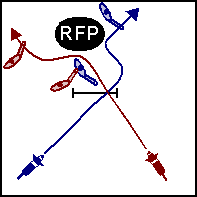
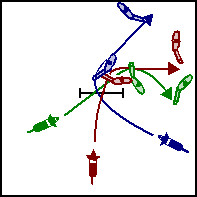
Reverse Flow Pivot On Take Off Side
Just like the Blind Cross you need some space before the jump to be able to perform a Reverse Flow Pivot. In the diagrams above my thinking was to have the handler complete the second Front Cross of the RFP so their path takes them just past the jump standard. Of course you can play with the approaches and make the RFP as dramatic or as subtle as necessary.
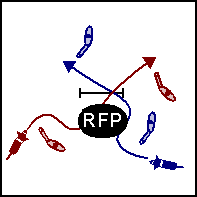
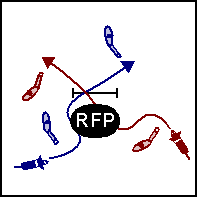
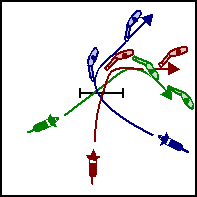
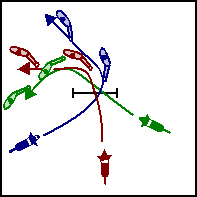
Reverse Flow Pivot On Landing Side
Just like the other handling maneuvers that require getting ahead of your dog, the Reverse Flow Pivot on the landing of the jump requires the handler to be ahead of the dog. For this maneuver I’d Lead Out to the landing side of the jump and work the RFP once the dog lands.
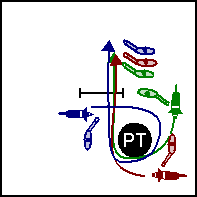
Lateral Lead Out
The Lateral Lead Out is basically the Come Jump drill with the handler offset from the dog’s path. So you set your dog up facing the jump (at various angles) and you are off set to the side of the jump. The further your are from directly inline with the jump the more difficult this is for your dog. In the diagrams there are two handlers of each color indicating ranges of locations where the handler might stand for each dog location. Of course you should vary all the other parameters I mentioned in the introduction too.
Lead Out Pivot

The Lead Out Pivot drill is basically the same as the
Lateral Lead Out drill and the Front Cross on the Landing Side drill. You lead out to the landing side of the jump facing the same direction as the dog and as the dog is committing to the jump you initiate the Front Cross/Pivot so the dog lands anticipating the turn. The location of the Pivot is where the Front Cross would be if you hadn't started out in a stationary position. For this drill you want to imagine there is a second jump at 90 degrees to the dog's path and you want to use a Front Cross to turn your dog to that jump.Front Cross On Take Off Side to Front Cross Jump Wrap
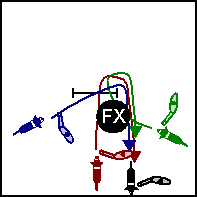
This combination of handlings is fairly common. For example, you might use it at the end of a Serpentine Serpentine Handling TechniquesSerpentine Sequence where there is an obstacle discrimination following the final jump. As for all Front Crosses you’ll need to start out this drill ahead of your dog. Since the dog and handler end up in the same place at the end I show the final handler position in black.
Front Cross On Take Off Side to Post Turn Jump Wrap
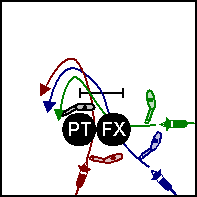
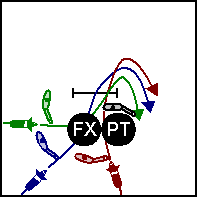
Just like above, start out ahead of your dog to initiate the Front Cross. Then step back behind the jump when performing the Post Turn to indicate a tight wrap around the jump standard. Since the dog and handler end up in the same place at the end I show the final handler position in black.
Rear Cross On Take Off Side to Front Cross Jump Wrap

In my experience this combination of handler maneuvers isn’t as common as the Front Cross to Front Cross but it is worthwhile to practice. As for the Rear Cross On Take Off Side drill you need to draw your dog ahead and initiate the dog’s lead change before the jump.
I find this to be one of the most difficult combinations. The reason being, you go from behind your dog when performing the Rear Cross to ahead of your dog to perform the Front Cross. Also working against the handler is the handler continuing in a parallel path to the dog after the Rear Cross, so the dog is getting a physical cue to continue moving forward, instead of getting a cue to wrap the jump. If you’ve trained a verbal jump wrap command you could get the dog to turn toward you on landing and then complete the wrap with the Front Cross. Let me know how you do on this one!
Rear Cross On Take Off Side to Post Turn Jump Wrap
Just like the preceding drill this is another difficult combination. At least for the Post Turn you can stay behind the dog after the Rear Cross so you aren’t racing the dog like you would be to get into position for a Front Cross.
If you enjoyed this article won't you please:  Thanks!