
Class Course - 2-Dec-2009
06 Dec 2009
Here’s a fun course I threw together for last week’s class at For Your Canine, it works on and off side weave entrances, tunnel A Frame discriminations, and a Threadle Traditional Threadle HandlingThe Connection Between Threadles and Back SidesThreadle Sequence. There is only one technical section, but being successful on this course requires understanding you and your dog’s abilities and then choosing which side of the obstacles is best for your team.
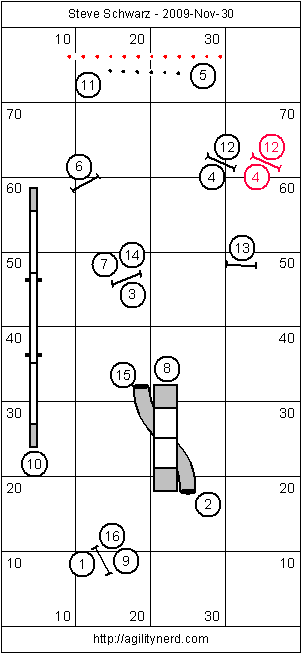
We ran the course using six weave poles but I’ve shown you can use twelve instead, I’d move jump 4/12 further to the right as I’ve shown above in red.
So before you read further take a second to determine how you’d handle this course. Can you handle the A Frame from either side each time? What benefits does each side give you? What skills do you need to be able to handle it on your uncomfortable side? I like to ask myself these questions on every course, they help me break out of handling ruts and identify weaknesses in our team.
Opening Sequence
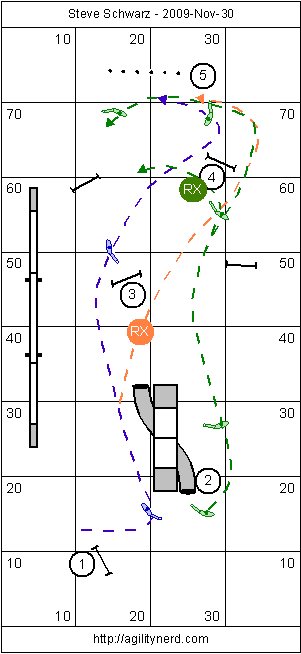
- You can run with your dog or take a short Lead Outusing the blue or green handler paths. The Lead Out shouldn't be necessary.
- Handling the blue path requires the ability to send to the tunnel. Of course handlers that have to go past the plane of the A Frame are punished by having to run back around it and that puts them (possibly) behind their dog coming out of the tunnel.
- Green path handlers can take a lead out all the way to the tunnel entrance. But their dogs can't have A Frame "suck".
- A "combo" plan of starting with the blue and Rear Crossing the tunnel entrance to continue on the green path can work but also requires a fast handler (you have to wait for the dog to get into the tunnel before you can run along the green path)
- The blue path is realistic only for teams where the handler is faster than their dog, because the handler must be past jump three and still be able to pick up their dog on their right hand. Having to Rear Cross Learning the Rear CrossRear Cross on the landing of jump 3 give a very loopy dog path.
- The orange variation of the blue path allows the slower handler to get the dog to turn on the take off of jump 3
- The green path at jump 3 requires a little finesse if the dog is even with handler going over jump 3, if you push forward two much you can drive your dog to the left of jump 4 (I know from personal experience). So a little hanging back until the dog commits to jump 4 or driving ahead past jump 13 so you can use motion to drive to jump 4 is helpful.
- Blue path handlers can Post Turn/Shoulder Pull Learning the Post TurnPost Turn/Shoulder Pull/Pivot Turn to "shape" the Off Side weave pole entrance.
- Green/orange path handlers can Rear Cross on the landing side of jump 4. This turned out to be very helpful for dogs that need help finding the entrance. The handler can exaggerate the dog's motion to the right of the course thereby giving the dog a straight on weave entrance. More experienced dogs should be able to hit the weave entrance with the handler Rear Crossing (late) on the take off side of jump 4.
So each side offered its own challenges…
Here’s the handling after the weaves:
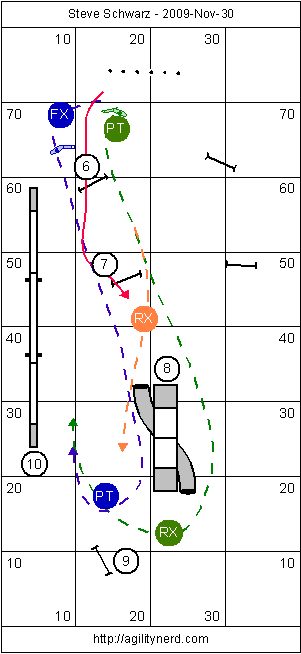
- Blue path handlers have to be able to get ahead of their dogs in the weaves and complete their cross so their dog has a straight line to jump 7. A late cross (or over rotating) could give the dog the red path.
- Blue path handlers have to push their dogs to the A Frame. It is important to have a path that comes close to, but avoids, the tunnel. Lateral motion to the handler's right could draw the uncommitted dog into the tunnel (motion is a primary cue>
- Green path handlers need to drive to the A Frame. The orange variation works nicely if the dog moves ahead and commits to the A Frame. The handler must drive through the cross so the dog knows it is a side change and not a turn toward the tunnel.
- The green path Rear Cross and jump 9 gave a nice turn toward the Dog Walk with the cost of the handler being behind the dog... run
Here’s the handling after the dog walk:
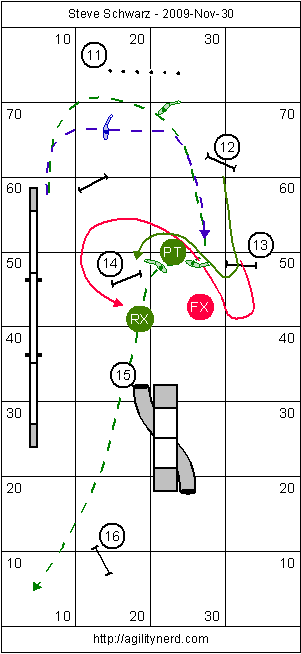
- The handling at jump 13 can be made easier for the handler if they can fade from the weaves (for dogs that need help with the On Side entrance), as shown in green. For dogs that don't need help with the entrance the handler can stay parallel to the dog as shown in the blue path.
- The most successful handling for the Threadle from jump 13 to 14 was using Backy-Uppy or Single Sided Threadle handlingas shown in green. The handler uses deceleration, rotation toward the dog and (possibly) the dog's name to cue collection and then brings the dog around their body to jump 14. They then drive toward the tunnel and Rear Cross.
- All the other strategies, Post Turn - Rear Cross, Front Cross - Post Turn, tend to push the dog wide at one jump or the other (or both) as shown in red. The problem is worse for the longer striding dogs. Smaller dogs can be successful with these handling approaches, but they were faster/tighter with the "Backy-Uppy".
I think everyone had fun running this course!
If you enjoyed this article won't you please:  Thanks!