
Intermediate Class - 2009-Jun-17
21 Jun 2009
It has been a while since I posted any of my class courses, I usually just dream up a sequence based on the equipment locations when I walk into the facility. Here’s one I made up for my intermediate class this past week, it gives some “city and highway driving”, a Serpentine Serpentine Handling TechniquesSerpentine Sequence, multiple handing possibilities, and ends on Threadle Traditional Threadle HandlingThe Connection Between Threadles and Back SidesThreadle Sequence. We had a good time running it and every student did really well on it. Here’s the layout:
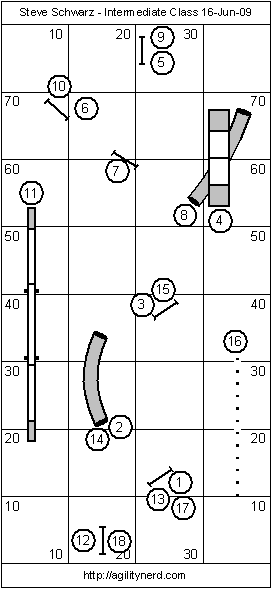
Handing Thoughts
Handling the Opening
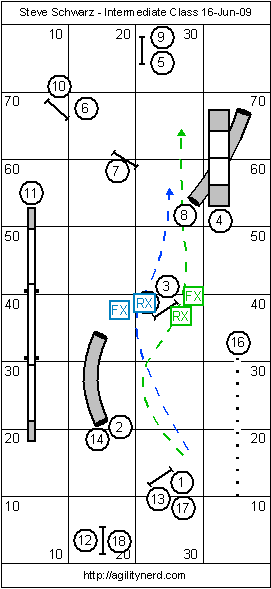
There are at least five options for handling obstacles 1-4. Ideally you should be able to do them all:
- Lead Out to the Front Cross Line Using the Handler Line - Front/Rear/Blind Cross LineHandler Line - Front/Rear/Blind Cross Line on the take off side of jump three, to the blue FX square
- Run into the Front Cross on the take off side of jump 3
- Run into a Rear Cross Learning the Rear CrossRear Cross on the take off side of jump 3 (Blue square RX)
- Rear Cross on the landing side of jump 2 as shown by the green RX square (stay close to the jump)
- Front Cross "over" jump 3 by rotating across the landing side as your dog approaches the take off. You want to use lateral distance from your dog to your advantage to make it easier to get into position.
With a running A Frame the Front Cross handlings let you get/stay ahead of your dog into the next section of the course.
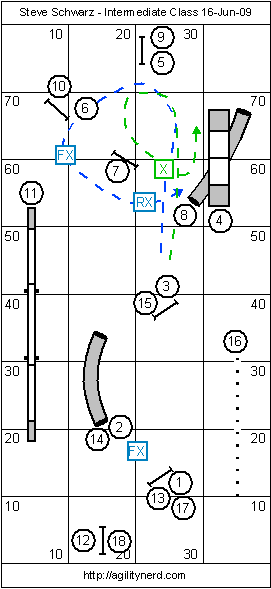
I like staying “inside the box” for the Pin Wheel/Serpentine Serpentine Handling TechniquesSerpentine Sequence combination as shown below in green. But almost all of the Serpentine Handling approaches worked. There were three handler problems:
- Cueing extension over jump six and pushing the dog to the dog walk (which even if the dog doesn't take the DW, their line is bad for getting into the tunnel.
- Not supporting jump six enough and pulling the dog off the jump
- Not getting to the green square X before the dog takes off for jump 7. Staying between jump 6 and 7 made for awkward Rear Crosses back into the tunnel.
Handling using the blue method wasn’t as successful as motion to the Front Cross supported extension and movement to the dog walk.
Once the dog is in the tunnel the next section of the course is nice easy highway driving handling. As shown above I liked the handlers to push to get a Front Cross between 13 and 14. It also lets the handler get ahead in case their dog needs assistance with the weave approach.
Speaking of the weave approach, if you have independent weave poles I liked using lateral distance and a fade away from the weave poles to the landing side of jump 17. Then it is just a recall to your left hand over the jump and a push to jump 18. Otherwise, a Front Cross at the end of the weaves and either a shoulder pull or a Front Cross Jump Wrap Jump Wrap Handling - With VideoJump Wrap Handling TipsJump Wrap/Wrap over jump 17 gets the job done.
Let me know if you give this course a try!
If you enjoyed this article won't you please:  Thanks!