
Building a Double Jump
22 Feb 2010
Even though the backyard was still covered with snow and ice, yesterday’s temperatures in the 30s got me itching to do something agility related so I finally built a double jump. Here’s Meeker posing in front of the finished jump:
Meeker Posing in Front of the New Jump Looking Over my Shoulder at a Squirrel

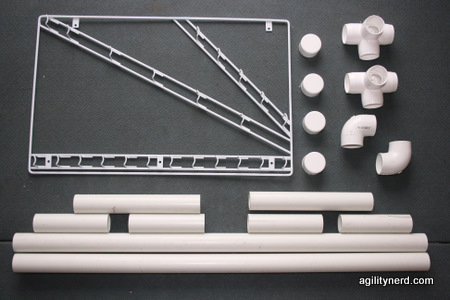
I had purchased the jump cup assemblies for a double and a triple jump from J & J Supplies three years ago. I even had all the PVC and fittings in various boxes and bags. Here is a list of the parts to build one double jump:
- (2) 10 foot lengths of 1 1/4" schedule 40 PVC
- (4) 1 1/4" 4-way PVC connectors
- (4) 90 degree 1 1/4" elbow joints
- (8) 1 1/4" PVC caps
- (1) pair of double jump cups
I think I got the 4 way connectors from PatiosToGo.com. I used the double jump cups from J & J because I’m too lazy to calculate and layout the location of the cups on the angles for the ascending height jumps. It cost a little more than individual cups but was well worth it in time. It took under an hour to cut and assemble both jump standards.
Each 10 foot length of pipe makes one jump standard. The cuts for each length of pipe are:
- (2) 36" lengths for the upgrights
- (2) 11" lengths for the cross bars
- Divide the remainder into 4 equal lengths for the feet (~6in lengths)
Here is a picture of all the pieces for one standard before assembly:
Assembly
This is a pretty simple jump to assemble but you should watch out for two things: the distance between the center of the two upgrights must match the holes on the jump cup assembly and you don’t want the PVC frame to be twisted. Oh and a third thing (I almost did) install the jump cup assembly right side up on both standards :^)
My biggest dilemma was actually assembling the jump. The PVC pipe I had was a very tight fit into the fittings. So I ended up using a rubber mallet to drive it into the fittings. Consequently, I didn’t use any PVC glue on any of the joints. If your connections are loose you should dry fit everything before applying any glue. Then you can put pencil marks across each joint so when you do glue it up you can align the pencil marks to get everything in correct alignment.
The general plan is to make the rectangular frame and then attach the feet to it.
- Start by putting an 11" cross bar between the two 4-way connectors. But don't drive the cross bar all the way in to both fittings.
- Install both 36" uprights into the 4 way connectors. Now you can use the two uprights to twist the two 4-ways so they are lined up and both upgrights are parallel.
- Place the jump cup assembly on the uprights and check where the mounting holes line up. Keep adjusting the distance between to the two uprights until the jump cup mounting holes are centered on each upright (I used my mallet).
- Install the top 11" cross bar into the two elbows, trying to keep the two elbows in the same plane. Adjust their distance until they fit on the two uprights.
- Put the box together and check that the top height is the same on both uprights, if not adjust and check that the box is square.
- Tap the caps on the ends of the four short PVC sections.
- Tap the short sections into the remaining holes in the 4-way connectors.
- Measure from the ground up to the first mounting hole of the jump cup assembly (J&J said to make it 3 7/8" but I eye balled it to around 4"). Center the drill on the upright and drill the hole. Screw the assembly onto the upright.
- Drill and screw in the remaining screws.
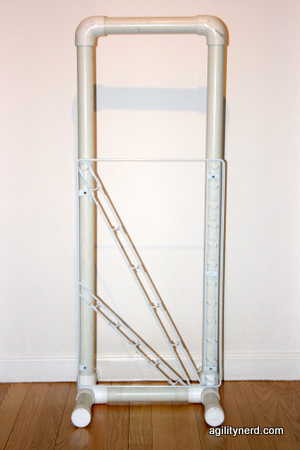
Here is my completed jump with two wings I made using Clip and Go Jump Wing Clips attached:

If you are going to make your own double jump I hope this gives you some ideas.
If you enjoyed this article won't you please:  Thanks!