
Contact Resurfacing - Part 2: Upgrading the Frame Structure
15 Sep 2014
In the first article of this series I showed how to remove the old surface of your A Frame, Teeter and Dog Walk. In this article I’ll show you how I modified the frames on my equipment to make it work with my new heavier rubberized surfaces.
All my old frames were built to support painted plywood. Plywood is strong and stiff with respect to point loads (force over a small area - like a 100 lb dog’s foot hitting the wood) and doesn’t need a lot of support underneath it (assuming 3/8 inch or 1/2 inch thick marine plywood).
What you do to the frame will depend on what type of surface you will be using and the piece of equipment you are resurfacing.
If you are using Aluminum sheet or Aluminum composite sheet you may need to add additional support on the frame to keep the sheeting from flexing or “oil canning” when the dog hits the contact. If you use plywood or one of the “plastic” rot free alternatives you may be fine as is. If in doubt contact the surface provider to get their experience.
Since dog walks and teeters are only 12 inches wide they typically don’t need extra support across their width. The existing framing often has cross bars for torsional stiffness and is usually enough to support standard surfaces.
Lastly, consider the additional weight of a rubberized surface. A rubberized A Frame is about 50-60 lbs heavier than a painted one. So if your equipment’s frame is marginal or you are considering adding wheels to help move it, do it before you put on the new surface.
A Frame Modifications
My A Frame was the first obstacle I worked on (two years ago) and I had decided to use “Alumaskin” aluminum composite sheeting from Max 200 for it’s new surface. It is a four piece A Frame (each side can be split - which gives you a contact trainer when you only use the two top pieces connected at the hinge). Here is the original framing for one side:
Original A Frame for One Side
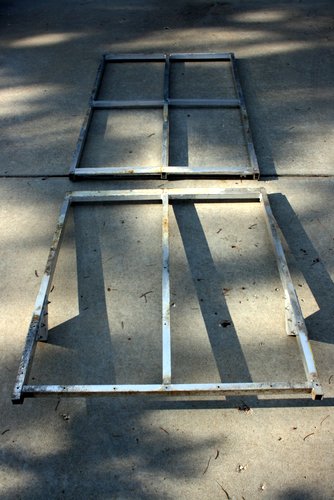
You can see the top half has one cross bar and the bottom half doesn’t have any. I decided to have some additional cross bars added to stiffen the frame and to support the aluminum surface so it wouldn’t flex or oil can when the dog hit it:
Modified A Frame for One Side
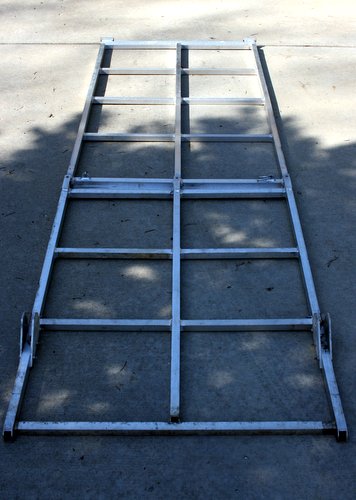
The welder did the job in about two weeks. It was only a few hours of cutting material and welding but it sat at the shop for a while before they got around to it. That is the downside of a small job in a busy shop. I probably paid about $150 for the whole job.
Teeter Modifications
As I mentioned above, the Dog Walk and Teeter/Seesaw don’t typically need additional frame modifications. But I also wanted to use this opportunity to try to stiffen my teeter and reduce it’s Teeter Whip. It was a two piece teeter that could be taken apart at the tipping point (fulcrum) for easy transport. That also meant that there was flex at the middle since the two halves were only joined by mechanical fasteners. So I had the frame welded together at the middle to reduce any flex there.
The rectangular tubing on my teeter is only 1 inch square which is why it whips so badly. Most modern teeters are made of at least 1 1/2 inch square or rectangular tubing; I’ve seen some that look like they use 2 inch tubing. The larger the vertical height of the tubing the stiffer it will be to vertical and torsional loads.
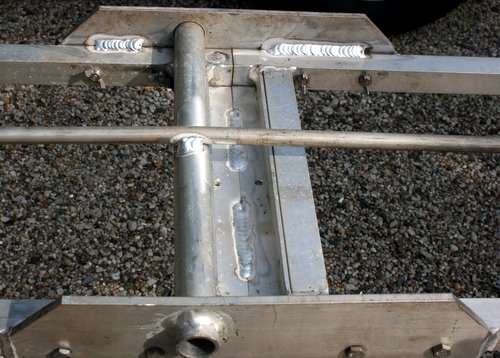
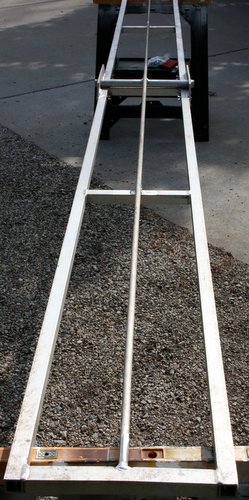
To mimic larger height tubing I took a trick from the design of the ramps on my Mark Ries Dog Walk. I added an aluminum rod to the bottom of the ramp from one end to the other to make it more like a truss. The advantage of a truss is its stiffness to vertical loads. So the rod is welded flush with the underside of the frame at each end and is welded to the pivot tube at the fulcrum. So that makes it effectively just under 2 inches thick at the pivot.
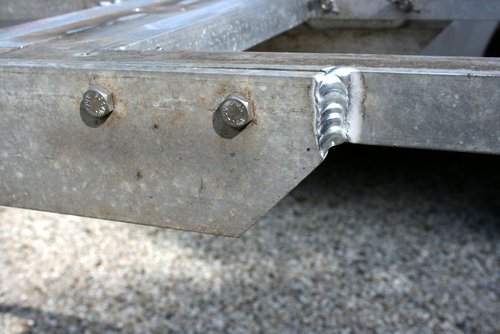
Side Weld Added at Plate Joining Teeter Halves
Underside of Teeter Fulcrum Showing Stiffening Rod and Side Plate Welds
Underside of Teeter Showing Full Length Stiffening Rod
It took the welding shop about a week this time and cost around $100 for parts and labor.
I can’t find the video I shot comparing the whip of just the frame before/after the modifications. But I think it is lessened with the truss design. I would have made it another inch deeper at the fulcrum if I had it to do over. I kind of like having a slightly whippy teeter to practice on; the dog is less likely to be spooked when they encounter one somewhere else.
Frame Preparation
For aluminum frames you really shouldn’t need to do much. I just took a wire brush and cleaned any dirt off the top of the frame where the new surface will go so it will sit flat against the frame.
If you have a steel or wood frame you should use this opportunity to thoroughly clean and prime the surfaces. Then repaint them to provide good protection from rust and rot. You don’t want to put new surfaces over a rotten or rusted frame! Never leave bare wood or steel exposed to the elements.
In the next installment I’ll cover installing the new skins.
If you enjoyed this article won't you please:  Thanks!