
Handling 270 Degree Jump Sequences
13 Mar 2005
The 270 Degree Jump Sequence is a commonly seen dog agility course element. Fortunately, handling the “270” is very similar to handling a Pin Wheel. So once your team has mastered handling a Pin Wheel you can easily move on to handling a “270”.
Depending on how the 270 is sequenced in the course and the dog’s approach and exit angles there are different ways to handle this two jump sequence. I’ll present five different handling approaches you might consider: Post Turn/Shoulder Pull, Take-off Side Front Cross, Landing Side Front Cross, Blind Cross, and Rear Cross.
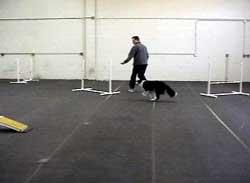
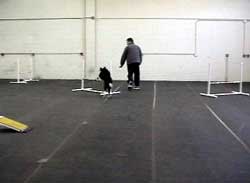
Post Turn
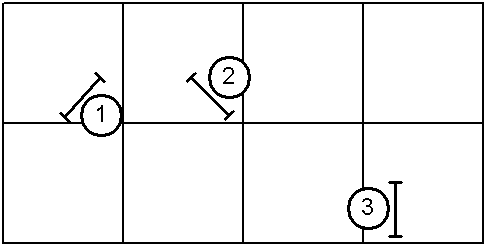
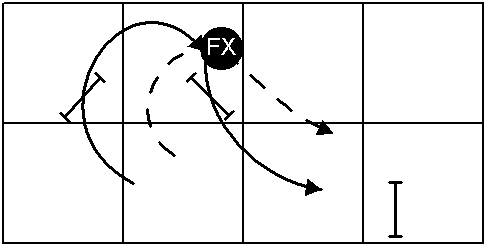
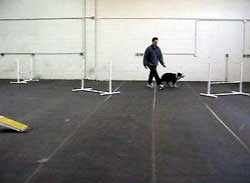
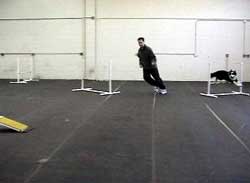
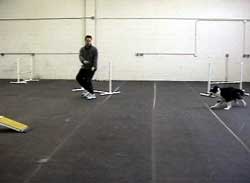
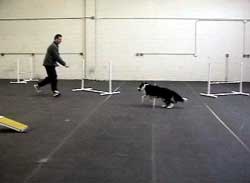
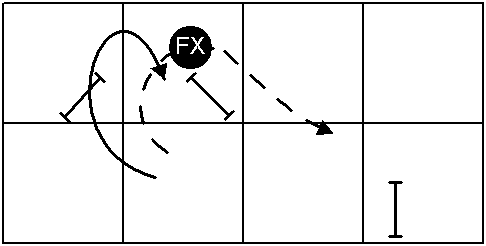
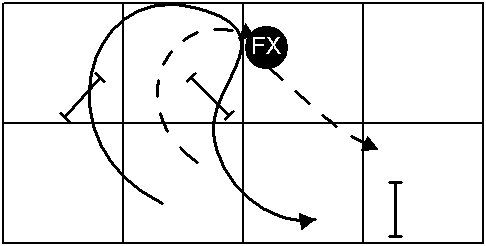
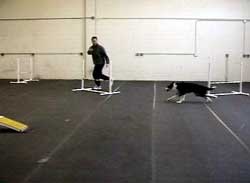
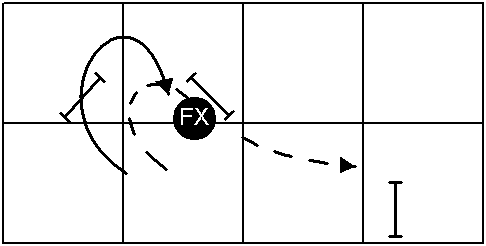
A common handling approach for a 270 is to get “into the pocket” or “inside the box” (center of the jumps) and pull the dog around the circle of jumps. This is the classic Post Turn Learning the Post TurnPost Turn/Shoulder Pull/Pivot Turn handling maneuver. Depending on the diameter of the jump circle and the confidence/training of the dog, a circular handler path can work:
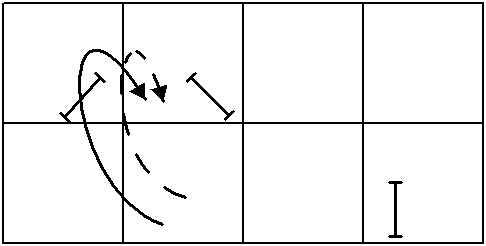
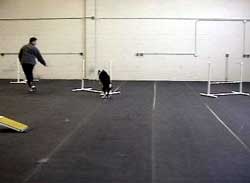
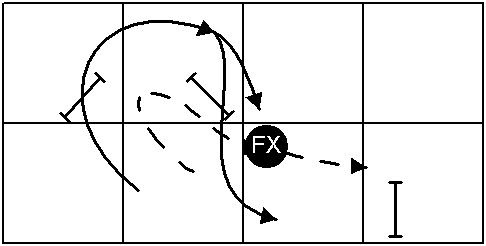
There are two errors handlers make when using a Post Turn on a 270. The first is turning much faster than the dog is moving. The handler should turn so the dog remains on their outstretched arm throughout the turn. The handler needs to lead (be ahead of) the dog to drive their dog’s motion through the turn. However, turning too fast can cause the connection between the dog and the handler to “break” and the dog turns to the other side of the handler (towards the inside of the turn). This is shown below:
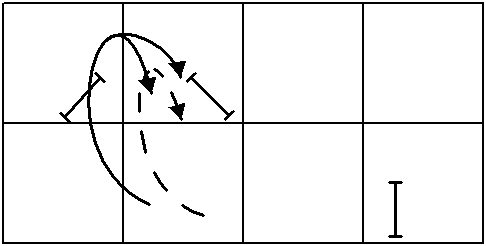
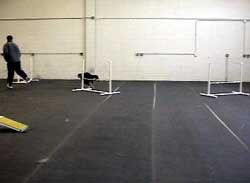
Handlers not supporting the dog’s path/line during the Post Turn can also cause the dog to curl in toward the handler and not take the second jump. This is especially important for the novice dog. Usually the handler doesn’t help the novice dog enough. They need to step far enough into the center of the turn to ensure the dog sees the take off side of the jump.
Either that or the handler doesn’t extend their lead arm (or the dog doesn’t understand the meaning of an outstretched arm). For teams that use Blind Crosses the failure to keep the lead arm extended could be interpreted by the dog as the start of a Blind Cross; so the dog would be “in the right” if they came to the handler’s other arm and missed the second jump.
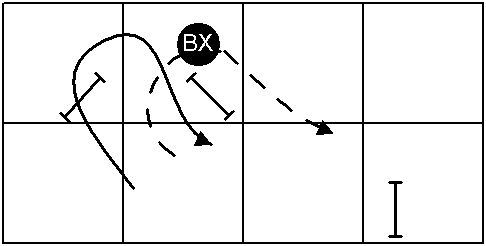
Take-off Side Front Cross
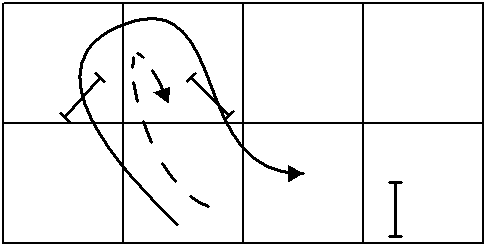
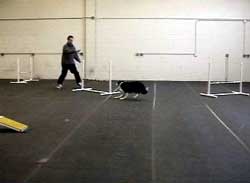
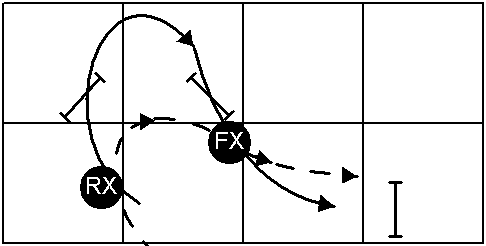
Depending on the shape of the 270, the location of the next obstacle, and the location of surrounding obstacles the 270 can be handled by cutting through the center of the jumps and performing a Front Cross Learning the Front Cross - VideoFront Cross on the take off side of the second jump. The key to a successful Front Cross in this situation is performing it only when the dog is past the near upright of the second jump. This way when the dog turns onto its new Lead Leg in response to the handler’s cross they are on line to take the jump. Unfortunately, the guidance provided by the Handler Line Using the Handler Line - Front/Rear/Blind Cross LineHandler Line - Front/Rear/Blind Cross Line for correctly locating Front Crosses doesn’t apply in this case.
Crossing too soon causes the dog to pull past the second jump (just like turning too quickly when using the Post Turn). Waiting too long to perform the Front Cross causes the dog to take a longer looping path through the obstacles. So it is critical that the handler use the dog’s position to cue them on when to initiate the Front Cross. These two errors are shown below:
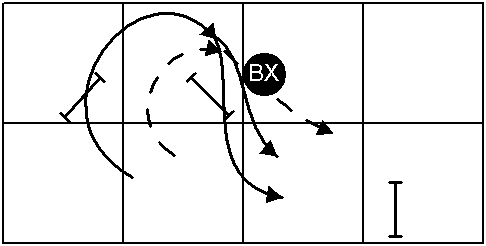
Landing Side Front Cross
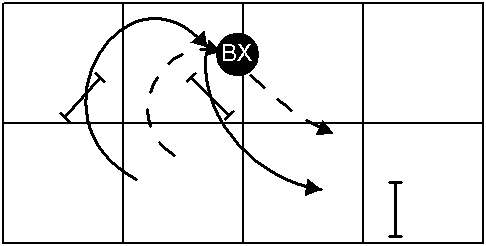
The more experienced dog can allow the handler to remain outside the plane of the jumps and perform the Front Cross on the landing side of the final jump. In this case the location of the Front Cross can be guided by the Handler Line - the line is between the second jump and the following obstacle (as shown in the diagram below by the dashed red line). This handling approach requires that a dog be experienced at distance work and that they understand using an extended lead arm to support their line through the jumps.
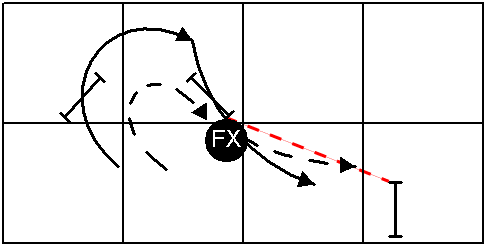
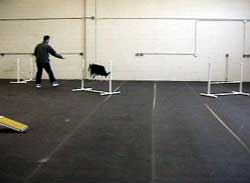
Of course, the timing of the Landing Side Front Cross is just as important as in the other handling methods. So it is critical that the handler use the dog’s position to cue them on when to initiate the Front Cross. Consequently, it is prone to the same handler errors as shown above for the Take-off Side Front Cross:
This handling is less forgiving than the previous two approaches because the handler is further from the dog and can’t as easily influence the dog’s path. So the handler may wish to use the dog’s approach to the first jump to assist in setting the dog’s line for the second jump. If the approach to the first jump can put the dog closer to the second jump and further from the plane of the two obstacles the dog is less likely to miss the second jump when the handler turns the dog. For example, using a Rear Cross before the first jump can send some dogs further over the first jump than using a Post Turn (“Know thy Dog”). Of course this approach to the first jump can be applied to any of these handling methods.
Blind Cross
It is conceivable that a Blind Cross could be used on the take off side of the second jump. I found it was awkward executing a clean Blind Cross at the right spot. If your back is to your dog when you dog is at the “right spot” to have its lead changed, you can’t see your dog. By “clean” I mean turning back to see your dog and picking your dog up on your new lead arm. If you execute Blind Crosses without the “look back” and just stick out your new lead arm and trust your dog to come to it then you could be more successful than I was.
In an effort at full disclosure, I attribute my difficulty with using
a Blind Cross to two things. Firstly, Blind Crosses are no longer part
of my Handling System (but that is a whole other
article) - so I’m not as proficient as I once was. The second problem
was, on the course I setup, I kept ending up on a right Lead; making it difficult to turn my head, shoulders and new lead
arm back to my right to pick up my dog. But for the more coordinated
this might be the perfect maneuver to use.
The main failure for this approach is executing the Blind Cross too soon. Then the dog misses the second jump. Executing too late causes the dog to drop the bar (trying to change leads on the way up or over the bar) or if you are so late that the dog changes leads on the landing side of the second jump, you could have trouble pushing the dog out to the final jump in the sequence.
Rear Cross
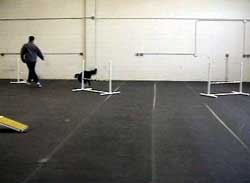
Yet another approach is to use a Rear Cross Learning the Rear CrossRear Cross on the landing side of the first jump. But this handling requires a different approach angle than I’ve been showing above (see below). I believe Bud Houston would call this type of Rear Cross a “Tandem Turn”. It is also called a “Cross on the Flat” in some Agility circles.
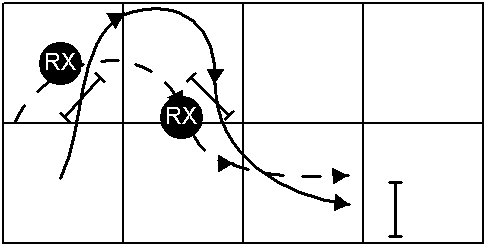
When approaching the 270 sequence from the left with the dog on the handler’s right, as shown above, the dog’s momentum helps carry it in line with the second jump. Then the handler’s Rear Cross turns the dog towards the second jump. The handler could Rear Cross again after the second jump to setup the third jump. Depending on your speed and your dog’s speed, a Front Cross after the second jump can be just as successful for this sequence.
Getting Started
When learning to handle the 270 I’d recommend that you and your dog first be comfortable handling a three jump Pin Wheel with the jumps at ~120 degrees apart. From there you can move to a three jump Pin Wheel with the outer two jumps separated by 270 degrees and the middle jump splitting the angle between the two outer jumps (135 degrees between the two outer jumps). Then remove the middle jump. The idea, when starting out, is to use pattern training to your advantage and work with a single jump layout and always turning in the same direction in a single (short!) training session.
If you start by handling “in the pocket” using a Post Turn your dog will quickly learn the pattern and your execution won’t have to be perfect. Once you are successful you can try the Front Cross on the take off side of the second jump (after first warming up with a couple successful Post Turns). Over time you can move on to the Front Cross on the landing side of the second jump. Initially work the two jumps in the same direction in a given session, again to take advantage of the pattern your dog will learn after a couple successes.
Once your dog has the basic skills you can start working the 270 in both directions in a single session (then you aren’t getting as much benefit from the training pattern). Work up to practising all of these handling methods in a single session. In your training don’t forget to vary the 270 diameter and the approach and exit angles. Of course you never want to drill this (or any) sequence over and over, keep the training sessions very short, focused (have a plan before starting an exercise), and fun!
With practice, these handling options will become second nature to you. During your practices keep track of which handling methods work best for you and your teammate. Then when you see one (or more) 270s in a course you don’t have to struggle with answering “How do I handle this?” you can focus on answering “What is the best way for my team to handle this?“.
If you enjoyed this article won't you please:  Thanks!