
Using the Handler Line - Front/Rear/Blind Cross Line
03 Nov 2004
After reading my Handler Line- Front/Rear/Blind Cross Line definition a reader sent in a jump sequence asking “How would I apply the Handler Line here?“. Her question showed that my definition didn’t give enough examples of applying the Handler Line in more interesting Crossing situations. So I’ll try to answer her question here.
Just to recap, the benefit of applying the Handler Line is that it helps you define and “enforce” the tightest, shortest dog path between two obstacles. But it also only applies when your Handler Path has shown that you need a Cross between those two obstacles. That is, the Handler Line is always applied after you’ve determined you need to Cross.
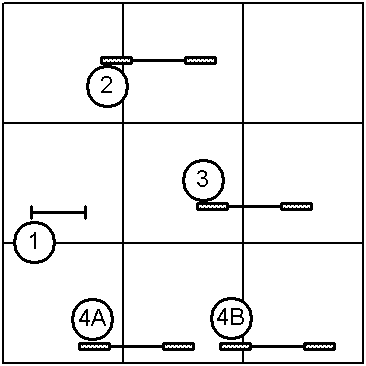
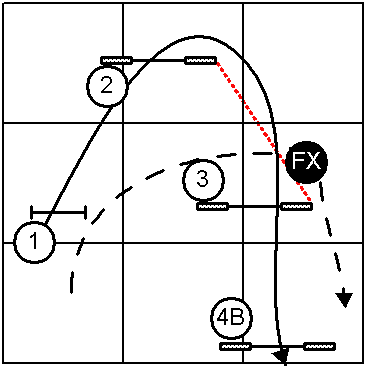
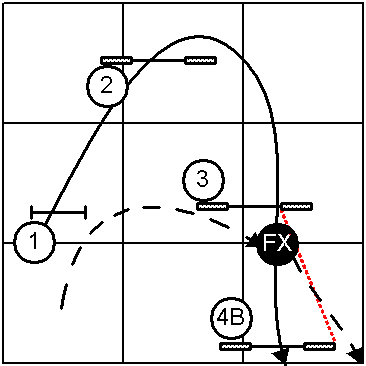
Here is the course, where the path either takes the dog through jump 4A or jump 4B.
Handler Strategies for the Sequence Through Jump 4A
I’ll take a stab at some possible handling strategies for the sequence through 4A and see if and where a Front Cross might be applicable and identify the Handler Line in those cases.
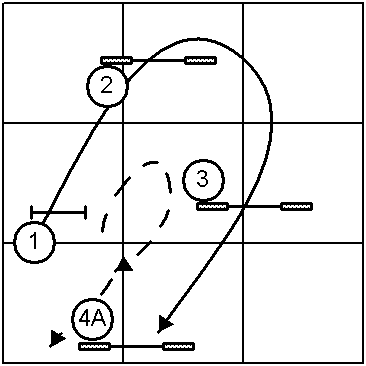
My first instinct is not to use a Front Cross at all. I’d just use a Post Turn Learning the Post TurnPost Turn/Shoulder Pull/Pivot Turn and keep the dog on my left through the whole sequence:
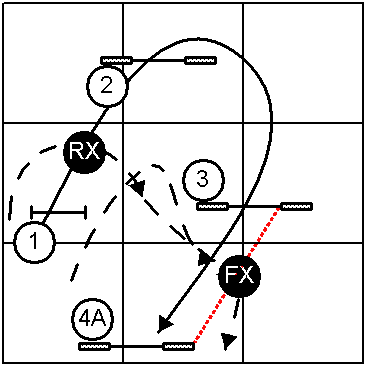
My preferred location for a Front Cross would be between jumps 3 and 4A. I’d setup the path through jumps 2 and 3 either by a Rear Cross Learning the Rear CrossRear Cross before jump 2 or by using an extended left arm to Support the Dog’s Line over jump 2. Here the Handler Line is easy to see and the Front Cross occurs as the dog is on the take off side of jump 3. (The Handler Path is the black dashed line and the Handler Line is the red dotted line).
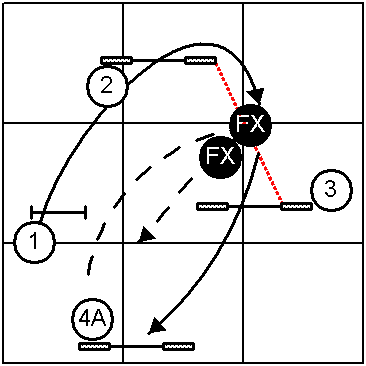
Another strategy choice would be to Lead Out to the Front Cross position between jumps 2 and 3 on the Handler Line. Then as the dog approaches close to my position after jump 3 I’d either Front Cross or let the dog pass and Rear Cross at the “X” to put the dog on my left hand. In the Front Cross case there is no Handler Line. Since this Front Cross shouldn’t change the dog’s path there is no Handler Line. It is a Cross whose only purpose is to change the Handler from one side of the dog to the other.

The last approach I can think of is to execute the moving version of the previous approach. In this case the first Front Cross occurs on the Handler Line because it is used to control the dog’s path. Then to get on the correct side of the dog for the next part of the sequence I’d Front Cross again.
Handler Strategies for the Sequence Through Jump 4B
This sequence is very similar to this one by Dana Pike that I discussed previously. The two handling strategies I outline below are discussed at the end of that article (but without showing the Handler Lines).
My first Front Cross handling strategy for this sequence is to Front Cross between jumps 2 and 3 on the Handler Line near to jump 3.
My second Front Cross handling strategy for this sequence is to Front Cross between jumps 3 and 4B on the Handler Line near to jump 3 while the dog is still on the take off side of jump 3.
I hope these analyses of Front Cross-centric paths (not all the possible paths) helps show the application of the Handler Line when a Front Cross is called for.
If you enjoyed this article won't you please:  Thanks!