Dana Pike Advanced Class Course - Feb 16 2006
24 Feb 2006
Dana Pike has had a lot of good courses lately but I've been too busy to write about any of them. This past week's course had a number of challenges and Dana covered multiple approaches to their handling. An non-traditional Serpentine Serpentine Handling TechniquesSerpentine Sequence opening was followed by a tough On Side weave entrance, a Layeringopportunity at the A Frame to get in position for the approach to the tunnel (and avoiding an off course). From the tunnel it was a long fast Serpentine Serpentine Handling TechniquesSerpentine Sequence back to the weaves. The course ends with a fade from the weaves to set the dog up for the correct tunnel entrance before the last jump. This is definitely a course to set up and try running the sections with different handling approaches. Here's her course: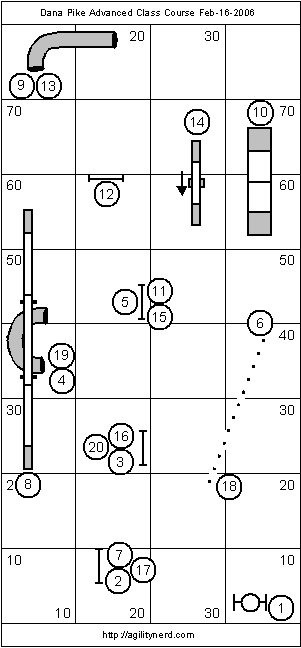
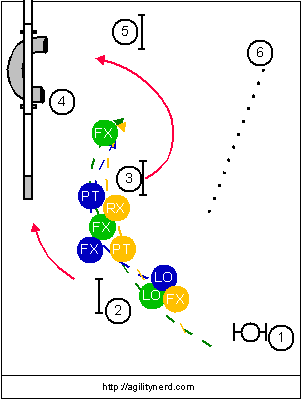
The opening four obstacles are the tire into a non-traditional Serpentine, non-traditional in the sense that the third obstacle in the Serpentine was not a jump. There were three primary handling approaches. The most common handling (shown in blue in the diagram below) was to use a Lateral Lead Out to between the tire and jump 2 picking up the dog on the handler’s left into jump 2. A Lead Out Pivot or Front Cross could work as well at that point too. The handler then had to redirect the dog over jump 3 and then not push the dog to the wrong tunnel entrance. So the blue path shows the handler using a Front Cross Learning the Front Cross - VideoFront Cross to tighten the dog’s turn after jump 2 and then hanging back sufficiently to Post Turn Learning the Post TurnPost Turn/Shoulder Pull/Pivot Turn the dog to the near side tunnel entrance. I used this approach with Milo and the first time I was too far up field and “bought” the off course entrance. There was enough spacing between obstacles that he was really moving and my body language pushed him away from me and the correct entrance.
The green handling replaces the final Post Turn in the blue handling with another Front Cross. This can give the tightest path and eliminate the possibility of an off course at the tunnel. But it requires the handler to be able to get ahead of the dog after jump 3. I have to admit I didn’t try this approach, the Post Turn is Milo’s Achilles heal so I worked that instead. However, for a fast dog/slow handler it would be challenging to get in position for the final Front Cross.
The gold handling shows the handler starting by running on a lateral path to their dog and using a Front Cross once the dog has taken the tire. This approach works well for dogs who run faster when their handlers run too. It is also helpful for handlers who end up “flat footed”, stuck in position, when using a Lead Out as their dogs go past. The handler then uses a Post Turn to pivot the dog to jump three. Once the dog is making the turn a Rear Cross Learning the Rear CrossRear Cross is used to change the dog’s Lead before the jump. By changing the lead before the jump the dog will wrap the jump Jump Wrap Handling TipsJump Wrap Handling - With VideoJump Wrap/Wrap more tightly and be on line for the correct side of the tunnel. The key to the Post Turn/Rear Cross approach is patience.
For all handling styles as soon as the dog commited to the tunnel the handler heads toward jump 5.
Three Options for the Opening
Coming out of the tunnel the dog should have maintained or even picked up speed so it will be moving fast. It is important that the handler clearing indicate jump 5 and not be in a position to hide the weave pole entrance. This on side weave entrance requires the dog to enter the gap after the first pole. There were two main handling errors. Handlers ahead of the dog over jump 5 used their left hand to direct the dog and when they brought that arm and the dog past them they flipped the dog toward the A Frame. The second error was handlers not assisting their dog to hit the entrance. As Dana pointed out this is a test of how well you’ve trained your weave entries. Ideally you should be able to be back at the tunnel exit, send your dog over jump 5 and as soon as they have committed give a weave command and start moving toward the weave exit. But most of us haven’t worked our weave entries that thoroughly, so we had to find the distance and handler orientation that allowed the dog to find the entrance with out skipping past the first opening or starting on the wrong side of the weaves. Practice, practice, practice.
From the weaves it was a basic run with your dog through jump 7 and the dog walk. Interestingly, Milo had trouble getting his hind feet under him until halfway over the dog walk. Dana had mentioned that a number of other dogs had had the same problem in running this course. I believe she mentioned that this is due to the distance approaching the dog walk. If I recall correctly Milo landed, took a large stride and then strode onto the dog walk without collecting at all. It could also have been that my body position was blocking the view of the dog walk and it was a surprise to him as he saw the up ramp.
From the dogwalk the handling of obstacles 9 through 13 is really determined by how the handler is turning the dog from jump 11 to jump 12. Take a look at the diagram and come up with your handling strategy. Some things to consider include: do you have to baby-sit the A Frame contact? If so can you beat your dog to the landing side of jump 11? Can you layer the teeter and still get your desired A Frame performance?
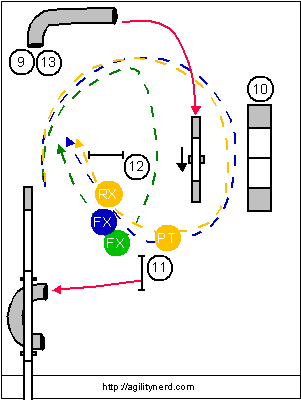
The diagram below shows three handling possibilities. Common to all approaches is the need for the handler to be able to cue the dog coming out of the tunnel that the A Frame is the next obstacle. This is accomplished by either showing the dog enough forward motion or accompanying the dog to the A Frame.
One of the handling possibilities is shown in blue below. In order to be in position for the Front Cross on the landing of jump 11 the handler has to either be faster than the dog or leave the dog behind on the contact and release it once the handler is on their way. After the Front Cross the dog should be in line for the tunnel entrance. A late cross directs the dog right into the off course tunnel.
The gold handling allows the handler to run with their dog from the A Frame and use the Post Turn to turn the dog to jump 12. Once the dog has committed to the jump the Rear Cross ensures the dog is turned toward the correct side of the tunnel. The handler is then in position for the remainder of the sequence. I initially failed to get into position using the blue handling and this approach worked nicely.
For dogs with distance abilities you can use the green handling and layer the teeter to give you the distance/time to get in position for the landing side Front Cross. I tried this on our second attempt at the course it worked beautifully.
A final handling approach (not shown below) is to use the Front Cross on the landing of jump 11 and not follow behind the dog past jump 12. If the dog understands a send to the tunnel the handler can stay on the take off side of jump 12 and direct the dog to the teeter as the dog exits the tunnel. This might be helpful for the next portion of the course…
Setting the Dog's Line for the Tunnel
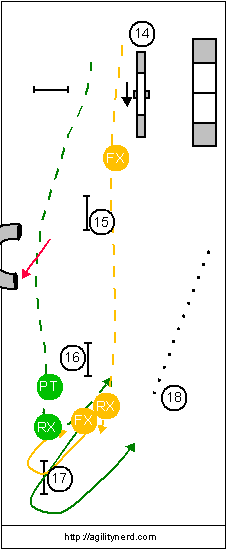
From the tunnel it is straightforward to get your dog to the teeter. Then it is a handler’s choice of classic Serpentine handling methods. As is often the case, the handling for the Serpentine is determined by the direction you’ll turn after the last obstacle. In this case which direction you want to Wrap the dog around jump 17. Distance-wise turning the dog to the right over jump 17 gives a shorter distance, keeps the dog on a right lead from jump 16 and gives a nice line to the weaves. However, turning the dog to the left “felt” better and was definitely the most popular initial handling. There are a multitude of handling permutations, I’ll just cover a couple.
The gold handling requires the least lateral distance from the dog. One danger of handling on this side of the jumps is the potential for the handler to push the dog off course into the tunnel. The dog is released from the teeter and a Front Cross turns the dog over jump 15. Then it is run fast to get ahead of the dog at the landing side of jump 16 or hang back and Post Turn the dog over jump 16. Once the handler and dog are approaching jump 17, the handler can use a Rear Cross to change the dog’s lead before the jump and start the wrap to the dog’s right. A Front Cross can then be used to further tighten the wrap.
The green handling requires the handler to obtain lateral distance and get ahead of the dog at the teeter. The dog is released as the handler approaches jump 15 and the dog is called to the handler as the handler is in line on the landing side of the jump. The handler races toward jump 16. It is important to keep the dog’s focus to avoid the tunnel and stay ahead of the dog enough to push the dog over jump 16. Then it is a slight Post Turn to turn the dog back to jump 17 and a Rear Cross to wrap the dog to the jump. The handler can stay on the left side of the dog on the approach to the weaves.
Serpentine Handling
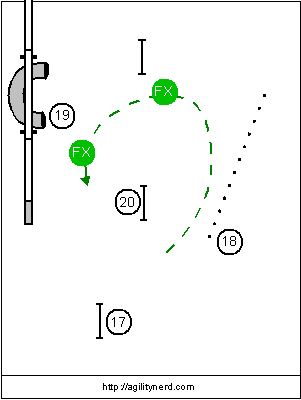
Assuming the dog’s approach to the weaves has been setup correctly the handler can start moving laterally from the dog while supporting the dog’s line through the weaves. The goal being to be in position to turn the dog toward the tunnel while avoiding the off course jump. Most handlers did this by getting near the jump and when the dog exited the weaves executing a Front Cross. This turns the dog and makes it clear to the dog to not take the jump (and the off course tunnel entrance). The final jump is handled with another Front Cross to get another tight turn and to avoid off course jump 5. This handling is shown below.
Handling the Finish
This is yet another “classic” Dana training course, good flow, good challenges, close and far handling, and multiple handling options at several sections of the course. Give this one a run!
If you enjoyed this article won't you please:  Thanks!
