Long Serpentine Course Opening
11 Jul 2006
I started writing this post back at the end of March and got distracted without finishing it (if I recall I was trying to fit it into my backyard and video tape it)…
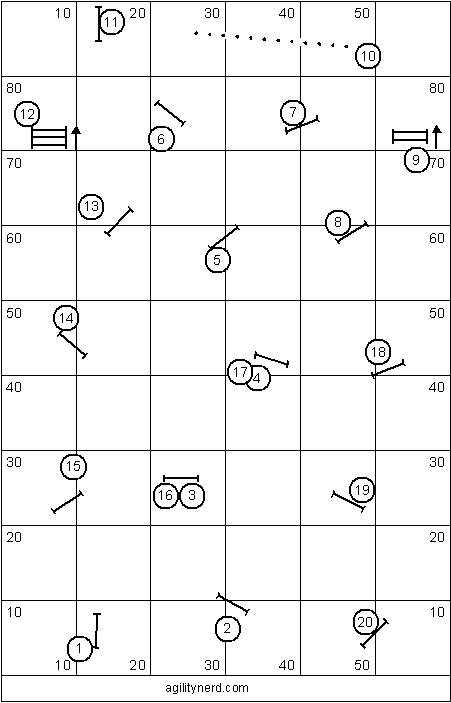
There was an interesting discussion on the CleanRun Email List about handling the long Serpentine Serpentine Handling TechniquesSerpentine Sequence opening of a Jim Saunders Jumpers With Weaves course. The 80 foot long nearly straight layout of the first six jumps sounds like it was quite a challenge. It looked like the kind of sequence where a handler can easily get behind their dog and be out of position to direct their dog. Fortunately, there didn’t appear to be any obvious off course traps. So the challenge to the handler remained deciding where to cross and actually being able to get there. It looks like it must have been a good course to run.
Here is Paula Orcutt’s version of Jim Saunder’s course:
Course Opening

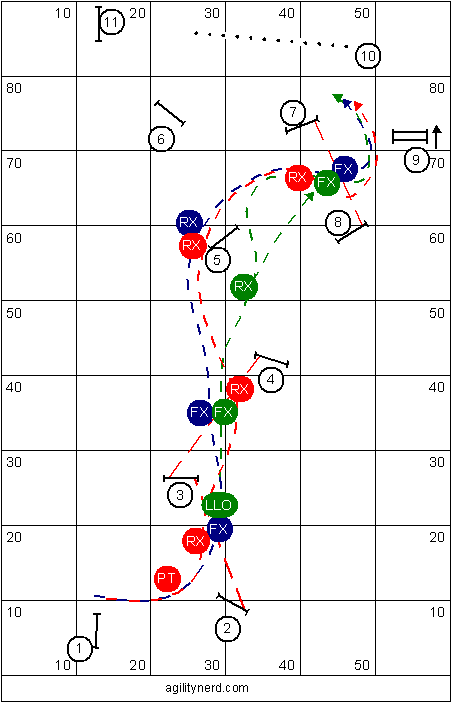
I have to admit I didn’t examine all the handling paths posted by those who ran at the trial or those who subsequently set up this sequence. I came up with three main options shown in the diagram below:
Handling Options

Green Handling
The green handler path is the path I’d like to imagine I’d be able to execute. The handler uses a Lateral Lead Out on the Handler Line Using the Handler Line - Front/Rear/Blind Cross LineHandler Line - Front/Rear/Blind Cross Line (shown as a red dashed line) between jumps 2 and 3. Then once the dog is committed to jump 2 the handler starts moving to the Handler Line between jumps 3 and 4 for the Front Cross. The Lead Out allows the handler to start out well ahead of the dog, making it easier on the handler to be in position for the Front Cross. Of course a Lead Out Pivot would have the same advantage.
The green handling continues with a Rear Cross Learning the Rear CrossRear Cross between 4 and 5. The motivation for crossing on the take off side would be for the handler to have shorter path to get to the landing side of jump 7. The big caveat with this handling is whether or not the dog will actually send to jump 6. I think a Rear Cross on the take off would be better than a Front Cross in the same location; as an over-rotation of the Front Cross could cause the dog to turn back toward the handler upon landing after jump 5.
I show two green paths on the way to jump 8. The topmost path is for those handlers who need to step in to Support The Dog’s Line to ensure the dog takes jump 5. Handlers whose dogs will send to jump 6 can “cut and run” right to the landing of jump 7.
The green handling finishes with a Front Cross over jump 7 (dog still on the take off side) followed by a Post Turn Learning the Post TurnPost Turn/Shoulder Pull/Pivot Turn to the double jump and another Post Turn to the weaves. The minimal spacing of the double to the weaves could easily cause a run by if the handler pushes on the dog’s line or if the dog doesn’t have well proofed weave entries. So this is a place where the handler has to trust the dog to Find The Entrance of the weaves and possibly hang back to let the dog do its job.
Blue Handling
The opening of the blue handling has the handler starting with a less extreme Lead Out (not shown) compared to the green handling and running at least some of the way through the first two jumps with the dog. The Front Cross between jumps 2 and 3 occurs on the Handler Line at about the same location as the Lateral Lead Out. Since the handler is moving just ahead of the dog it is more challenging for the handler to get to the second Front Cross between jumps 3 and 4. The “bail-out” handling for the handler who doesn’t get in position is the red Rear Cross.
From the Front Cross ahead of jump 4 the blue handling shows the handler continuing with the dog on their right over jump 5. Then the handler Rear Crosses the dog on the landing of jump 5 (aka a Tandem Turn) to set the dog’s line for jumps 6 and 7. The benefit of waiting to perform the Rear Cross on the landing side is the dog does not have to send as far to jump 6. This handling is also less likely to pull the dog off jump 6 as the green path’s take off side Rear Cross might.
Once the dog takes jump 7 the closing of the blue handling is the same as for the green handling. But by postponing the Rear Cross of jump 5 to the landing side of the jump the handler has less time to get to the Front Cross position when compared to the green handling.
Red Handling
The red handling is all about handling from behind the dog. Again a Lead Out may or may not be used at the start. It is less useful if the handler is going to be letting their dog get ahead of them in two jumps in order to Rear Cross Learning the Rear CrossRear Cross. A Post Turn Learning the Post TurnPost Turn/Shoulder Pull/Pivot Turn is used to initiate the turn prior to jump 2 and the handler allows the dog to get ahead of them to Rear Cross on the take off of jump 2. Then it is another Rear Cross on the take off of jump 4.
I have shown the red handling with a Rear Cross on the landing side of jump 5 for the same reasons as in the blue handling. The Rear Cross on the landing puts the handler further behind than crossing on the take off. However, since the handler is planning on Rear Crossing between jumps 7 and 8 (and will need to be behind the dog) this is not as problematic as for the blue handling.
Other Handling Options
At any point on the course where the handler needs to change the dog’s Lead Leg the handler can use any crossing maneuver in their arsenal. For example, while my personal handling style rarely uses Blind Crosses, almost all the Front Crosses shown above could be replaced with Blind Crosses (since there are no off course options). A handler might also choose a cross from a different colored handling at each lead change based on their team’s abilities and how far ahead or behind they are of their dog.
So if you were a fast handler and/or had a slow dog you could use an “ala carte” handling system where you choose any cross from the group shown at each change of side/lead. Might be “interesting” to try…
How would you handle this sequence?
If you enjoyed this article won't you please:  Thanks!
