Advanced Class Mini Course
12 Aug 2010
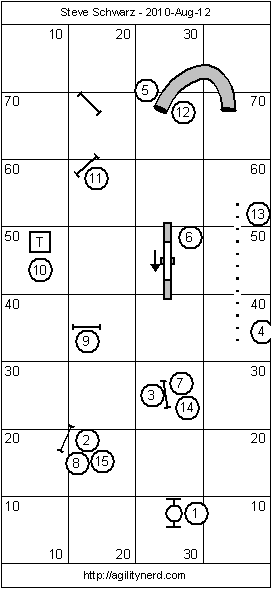
Here’s this week’s class course from For Your Canine with a number of different handling possibilities; if there is a message to go with this sequence it is probably “you don’t need extra crosses if you drive to where you are going”.
I’ve outlined my thoughts on handling this sequence following each of the diagrams.
Handling the Opening
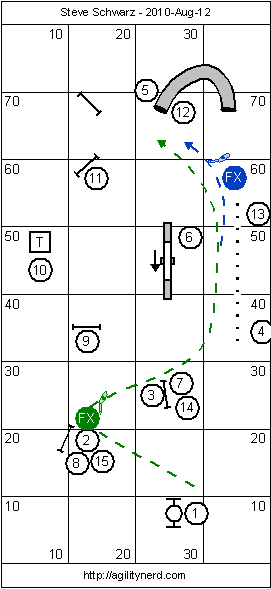
At most a minimal Lead Out, as long as the handler cues the Jump Wrap Jump Wrap Handling TipsJump Wrap Handling - With VideoJump Wrap/Wrap at 2 before the dog commits to the jump. The alternative of a Post Turn/Shoulder Pull Learning the Post TurnPost Turn/Shoulder Pull/Pivot Turn with a Rear Cross Learning the Rear CrossRear Cross on the landing of 3 gave a wider and slower path.
Handlers should be able to just drive to the #5 tunnel entrance. For dogs that drive off course in spite of their handler’s motion, a Front Cross Learning the Front Cross - VideoFront Cross at the exit of the weaves would work; or if the handler wanted to take the teeter with the dog on their right. Teams should work on handling both ways.
Handling the Middle
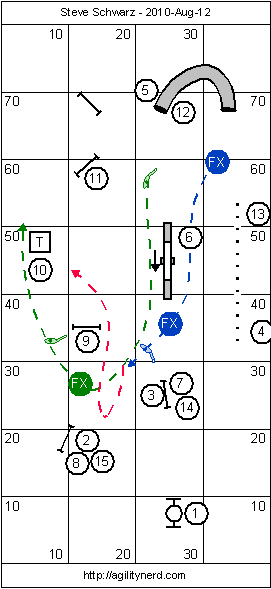
The only safety concern on this course was the dog’s approach the teeter from the tunnel. That caused some handler to choose the blue path above. They’d use a Front Cross (while the dog was in the tunnel) to pick their dog up on their right arm and set the line to the teeter. But that really wasn’t the best side of the teeter to be on considering the rest of the course…
For handlers handling with their dog on their left over the teeter the key aspects were talking to their dogs while in the tunnel and not driving forward until they had reconnected with their dogs. If all the dog saw coming out of the tunnel was the handler driving forward, it drove the dog right to the weaves (as you’d expect).
The 7-8-9 Pin Wheel was best handled along the green path. The Front Cross between 8 and 9 tightened the dog’s line. I preferred running to the back side of the table as opposed to Rear Crossing, it allowed the handler to use their motion to drive the dog to the table instead of waiting for the dog to pass them. It also left the dog pointing toward the next obstacle.
Handlers trying to keep the dog on their left all the way to the table treating it like a Serpentine Serpentine Handling TechniquesSerpentine Sequence were only successful if they didn’t have to drive all the way in to support jump 8 and were able to beat their dog to the landing side of jump 9 (as shown by the red line).
Handling the Closing
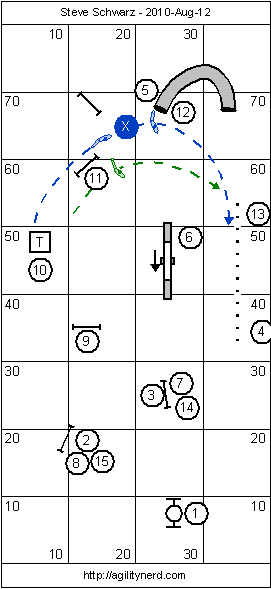
The discussion point from the table was if the dog would take the off course jump after jump 11 (if you set this up you can move it around to make it harder or easier). Some students in my first class preferred the blue path, cuing a Jump Wrap and either Rear Crossing or turning out of the wrap into a Front Cross. My later class all handled it by driving toward the tunnel along the green path. Teams should be able to handle it either way just like the exit of the weaves at 4
I hope you give this one a try. My students did a great job and got to try several handling approaches.
If you enjoyed this article won't you please:  Thanks!
