Handler Line - Front/Rear/Blind Cross Line
28 Oct 2004
The Handler Line, Handling Line, Front Cross Line, Rear Cross Line, or Blind Cross Line is an important concept that all Agility handlers should understand and can apply in the handling of every Agility course. It is not the same thing as the Handler Path. The Handler Path is the path the handler takes through the course.
The Handler Line is the invisible line connecting the edge of one obstacle to the edge of the next obstacle only when a Front Cross Learning the Front Cross - VideoFront Cross, Rear Cross Learning the Rear CrossRear Cross or Blind Cross is planned between the two obstacles. It does not define between which obstacles a cross should be performed; only the most efficient location between the chosen obstacles for the cross.
So once you’ve determined your Handler Path through the course you’ll have identified where you want to use Crosses. One of your next steps should be identifying the Handler Lines connecting the pairs of obstacles surrounding each of your Crosses. Performing a Cross off of/away from the Handler Line causes the dog to take a wider, longer and slower path between the two obstacles.
The Handler Line can also be identified when a Lead Out is used in place of performing a cross. In this case the handler should position themselves just as if they had completed the Cross and then release the dog, indicating the first jump and then turning towards the second jump prior to the dog committing to the jump.
The Handler’s Line for a Cross is a guideline, a very powerful guideline, especially when you have a tight portion of a course where you need to control the dog’s line. My goal for this article is to help you identify the Handler Line, discuss alternate Handler Line definitions, and demonstrate the use of the Handler line in several situations.
Two Definitions
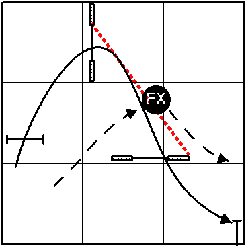
I learned about the Handler Line from Dana Pike and she defines it as the line formed by connecting the outside edges of two consecutive obstacles on the side of the obstacles where the Cross should occur. In the case of winged jumps the Handler Line runs from the inside edge of the first jump to the outside edge of the second jump; since the handler shouldn’t run into the jump wing if their path takes them close to the second jump. The Handler Path is shown in the diagram below by the black dashed line and the Handler Line by the red dotted line:
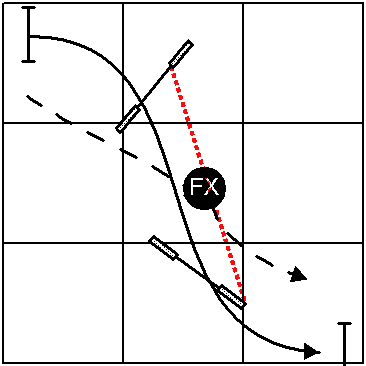
By defining the Handler Line in this way the handler is always out of the dog’s path. In basketball parlance it leaves the dog the “lane” between the obstacles. Another way to think of the Handler Line is it is the edge of the road, where the handler always gives the dog the road to run on.
Other trainers define the line as connecting the opposite edges of two consecutive obstacles. Where the line starts at the edge of the obstacle nearest the handler prior to the cross to the edge of the obstacle nearest the handler after the cross. I’ve been told that Elicia Calhoun uses this definition. The Handler Path is shown in the diagram below by the black dashed line and the Handler Line by the red dotted line:
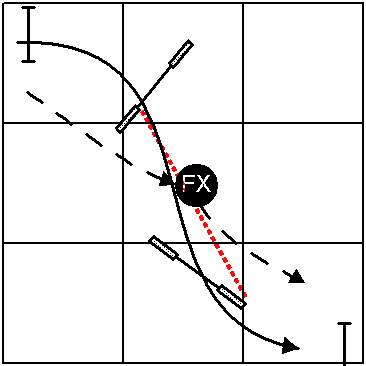
By defining the Handler Line in this way the handler is actually crossing on the dog’s path through the obstacles. The handler still begins their Cross on the line, but is out of the way when the dog passes that point of their path. This approach purposefully limits the portion of the incoming obstacle available for the dog in an effort to further control the dog’s path between the two obstacles.
This definition places the handler “in the road” for the Cross but the handler is out of the way (“off the road”) when the dog is at that point of the course. You can also think of as giving the dog a narrower road on which to run.
One complication are situations where a Cross is performed between two obstacles and the obstacles are arranged with a 180 degree angle between them. In these cases you can’t draw the Handler Line, so the plan should be to stay as close to the obstacles as possible while allowing the dog to land and change their Lead Leg. In practice this can be as close as 18-24 inches from the plane of the obstacles.
Handler Line Examples
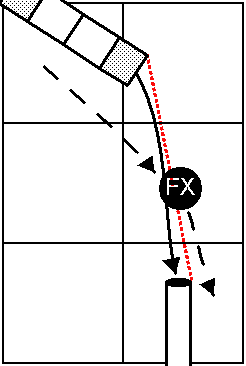
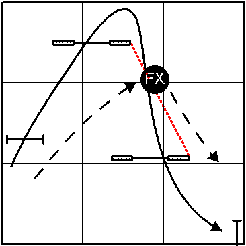
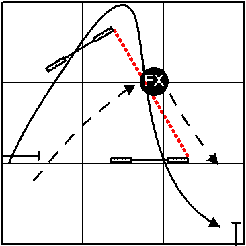
The diagrams below show the Handler Line using the first definition in a number of situations. The Handler Path is shown by the black dashed line and the Handler Line by the red dotted line:
Between Any Two Obstacles
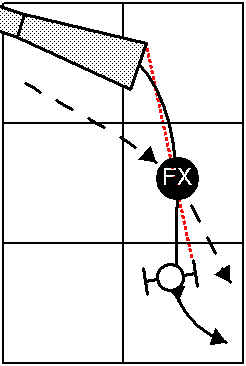
Alternate Obstacle Angles
Why Care About the Handler Line?
Regardless of the definition, crossing on the Handler Line is intended to restrict the dog’s path to the tightest possible path between the obstacles. This is because in order for the dog to “honor” the handler’s request for the Cross the dog must pass close to the handler. So when the handler Crosses on the Handler Line, the cross controls the dog’s path and puts the dog “on the road” between the obstacles. Once the handler and dog are executing Crosses effectively the dog won’t take a wide path between the obstacles.
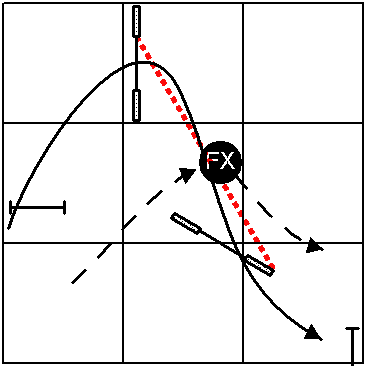
The following diagrams show the impact on the dog’s path of the handler not crossing on the Handler Line. The Handler Path is shown by the black dashed line and the Handler Line by the red dotted line:
Front Cross on the Handler Line
Front Cross Past the Handler Line
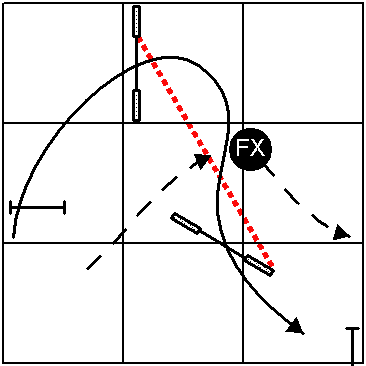
Front Cross Before the Handler Line
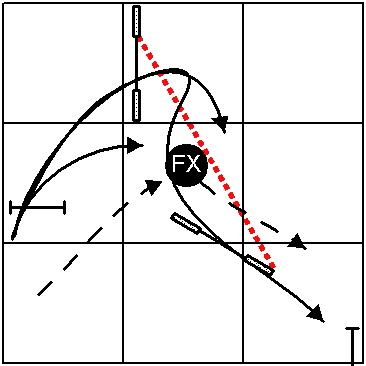
That is not to say that a dog can’t take a wider path when the Front Cross occurs on the Handler Line. But in the worst case the path for the Front Cross has the dog travel behind the handler before completing their turn. To fix this the handler holds their ground, reaches behind them and wraps the dog around their body. At the moment the dog completes the wrap it is back on the desired path to the next obstacle. As the dog learns to understand the Front Cross (or the handler learns to executes it correctly) the dog is less likely to wrap behind the handler. This is diagrammed below:
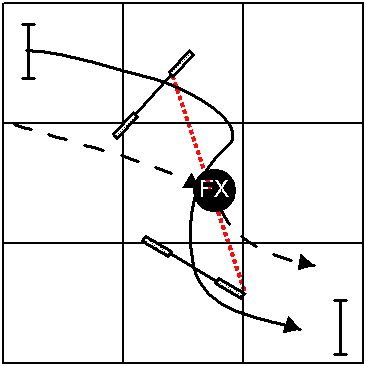
That is also not to say that the handler must always stay in position at the Cross point either. On a tight course it might be beneficial to enforce the dog’s line by staying in place; but on a more open course the handler just performs the Cross on the Handler’s Line and continues to the next obstacle. Even on a wide open course the Handler’s Line is still beneficial because it gives the handler a concrete reference point between the obstacles.
Executing the Front Cross on the Handler Line
I recorded a video clip of Mr. Peabody and me demonstrating the Front Cross on the Handler Line in my tiny Chicago back yard. I set up the camera pointing down the Handler Line so you can judge if I’m on the line when I make my cross.
Handler Line for Lead Outs
Another scenario where the Handler Line comes into play is when a Lead Out is performed between two obstacles and the handler wants to control the dog’s path between the obstacles. In this case the handler is just removing a Cross by standing on the Handler Line in the location where they would have performed the Cross. For example, if the handler were to lead out to the “FX” position in the diagrams above they could face their body towards jump 3 and reach back with their right arm to call the dog to them over jumps 1 and 2. This is equivalent to performing a Front Cross between jump 2 and jump 3 on the Handler Line; the handler’s position influences the dog’s path in the same way.
I recorded a video clip of Mr. Peabody and me demonstrating the Lead Out on the Handler Line to clarify my description.
In summary, look for the Handler Line whenever you need to Cross between two obstacles. You might also take a look at this discussion of applying the Handler Line to a course.
Special thanks to the members of the Agile Teach email list for identifying confusing areas of this definition (yes it was even more confusing before…).
Click this link to search the whole site for “Handler Line”.
If you enjoyed this article won't you please:  Thanks!
