Serpentine Handling Techniques
15 Feb 2008
The Serpentine is a common obstacle sequence and there are many ways to handle it. I’ll present the most common approaches and I’ve created a short video demonstrating most of them.
There are basically two broad categories of handling:
- The handler changes sides on each side of the middle obstacle to assist in turning the dog.
- The handler stays on one side of the obstacles throughout the sequence.
Two Sided Handling
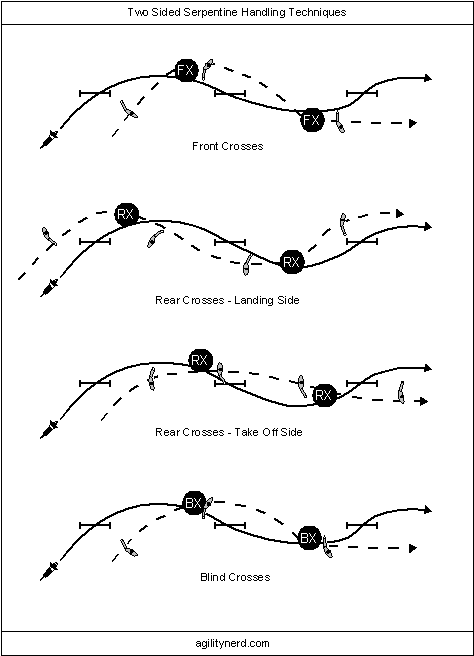
The “Two Sided” handling approaches use (almost) any combination of two crosses to turn the dog on each side of the middle obstacle. In the diagram below I show how you would apply the three different crosses: Front Cross Learning the Front Cross - VideoFront Cross, Rear Cross Learning the Rear CrossRear Cross, and Blind Cross to the same Serpentine sequence. With the Rear Cross you can choose whether you turn the dog on the take off or landing side of the jump so that gives you a fourth approach.

My diagram shows using the same cross before and after the middle obstacle. But there is no reason why you can’t use one cross before and a different one after (although choosing a Rear Cross followed by a cross requiring you to be ahead of your dog would be more difficult to execute with a fast dog).
Execution
When executed perfectly the dog’s path should be as close to a straight line through the three obstacle as possible. That requires good execution of your crosses and most importantly being in the right place at the right time.
You want to perform each cross as close to the plane of the jumps as possible; the further you move away from the plane the longer and wider your dog will jump and turn after each jump. Ideally you want to leave only the width of your dog between you and the jump. Some handlers think they are helping their dogs see the jumps by crossing further away from the plane of the jumps. But I’ve found the opposite to be true. By staying tighter to the jumps it gives clearer information to the dog that this jump is where we are going next, there is no need to look elsewhere for our next obstacle. This article on the Handler Line Using the Handler Line - Front/Rear/Blind Cross LineHandler Line - Front/Rear/Blind Cross Line discusses Front Cross location in more detail.
As to where along the plane you perform the cross the usual rules apply: you want to cross between half way and two thirds of the distance to the next jump. Lastly, for the Front and Blind Crosses if you dog has to collect or turn around you, you are too slow, get moving!
Single Sided Handling
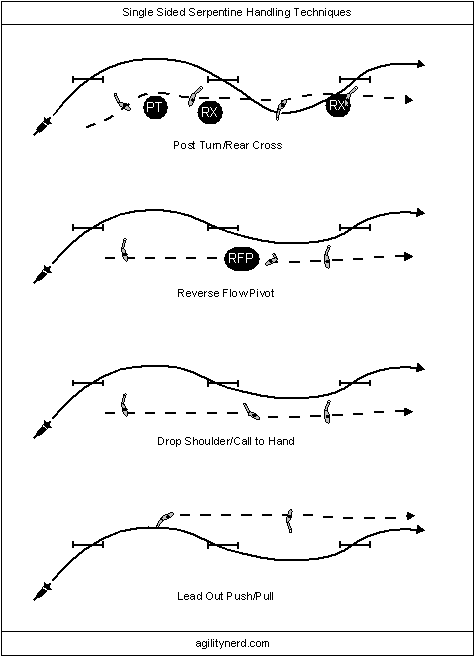
Handling a Serpentine from one side of the jumps is often the easiest approach for the handler and can provide the fastest performance too. The diagram below shows three approaches where you start in motion and a third from a start with a Lateral Lead Out or Lead Out Push.

Execution
The primary key to all the Single Sided Serpentine approaches is to have done your One Jump Back Side of Jump Handling Combinations - VideoOne Jump Drills work so your dog understands your cues. The cues you use around the second obstacle are exactly as though you were practicing on a single jump; they are just in sequence now.
I’m not too likely to use the Rear Cross handling myself, as I’d prefer to work to get ahead of my dog for one of the other methods. I also think it gives a slightly wider path for the dog following the second obstacle as you cross behind your dog on the landing side.
For the Reverse Flow Pivot or False Turn and Drop Shoulder the handler has to be ahead of their dog and passing the second obstacle to cue the dog’s turn to the second obstacle. I believe the RFP approach would fit within Greg Derrett’s system.
For the Lead Out Push the normal rules apply: position yourself where you would Front Cross if you were running the course. Then you run the remaining obstacles keeping just ahead of your dog to push your dog over the second obstacle and then pull your dog back to you over the third obstacle.
Some Example Video
I’ve video taped Serpentines several times over the years and never got around to editing the video or writing this article. So here is some video I shot a couple months ago with Meeker. Like usual, I took the video all in one session, my execution isn’t always the best, and I left out a couple of the handling variations. But I’ve got the major approaches covered so it should help clarify my descriptions.
So give some of these approaches a try in your next practice session so you’ll be comfortable the next time you see one in a trial.
If you enjoyed this article won't you please:  Thanks!
